Quick update on the 0-60 time. I occasionally make a pass on my way to work and see what time I get. I still spin the wheels a bit, but I've been getting 12.8 seconds pretty consistently, so this may be the best I can do.
I can't help but think a real driver on a track could do better, but this will have to do for now. Still, it's faster than a Triumph Spitfire, MGB or the original Porsche 914 - http://www.albeedigital.com/supercoupe/articles/0-60times.html
I'll continue taking an occasional pass to see if I can better 12.8.
Sunday, December 6, 2009
Friday, October 23, 2009
Denied!
I'm looking at adding an AVCON charging port to the car since the public charging locations here in SF are mostly all equipped with them. In order to use the public charging spots in parking lots, you need to have the proper silver ZEV stickers on the car. Since the car is now registered and the stickers are only $8 (plus they let you drive in the carpool lane) I figured I'd send in the form.
This was in September.
A month later I get a letter from the DMV - not with my stickers, but with my uncashed check and a nice letter explaining that a 1992 Miata is a gas car and if I want to register it as Natural Gas, blah, blah, blah.
The form wasn't very detailed - it was intended for hybrids, those Ulta Low Emission Vehicles and maybe an EV1 or RAV 4 EV - not for a conversion. I can see how they might think I was just trying to get into the car pool lane for free...
After stewing for a couple of days I wrote them what I thought was a nice letter and included a copy of the BAR Referee certificate to prove the car is now electric.
I was going to include some pictures, and a link to my web site, but figured that may just annoy them.
We'll see what they say.
Tuesday, October 20, 2009
New website is up!
I'm happy to say the new website is finally up! We've been working on getting the kits ready to ship, getting the new web site designed, working through a bunch of issues with PayPal then Google Checkout, but it's finally ready to go - at least close enough, and I'm tired of looking at it.
The kits are orderable from the pricing page and we decided to have a special introductory price of $2,000 instead of the $2,500 we plan on charging. How long will the discount last? Don't know. You might want to buy one now while you can save the $500.
I was hoping to have a shipping through a couple of carriers but this turned out to be a big hassle, so shipping is through UPS only for now.
I no longer have a link from the site to this blog - I wanted to keep it the way it was rather than try to give it a serious business tone. I have another blog - EV Miata News - for the serious business stuff.
If you feel like it, drop me an email to let me know what you think and especially if you find any bugs, typos or etc.
Thursday, October 1, 2009
The Tail
I'm not one for a lot of stickers on my car, so I find most people don't notice that my car is electric. One afternoon I was thinking of putting something where the tailpipe was and struck upon the idea of hanging an electrical plug there.
It's not connected to anything - in fact it's just the plug I cut off my Iota dc/dc converter connected to a vacuum hose tie wrapped to a bolt. But it does the job. It swings around as I drive pointing out that my car has no exhaust pipe and plugs in.
As soon as the day after I did it I started getting complements from the neighbors, so I knew it was working.
So this morning I was stopped at a traffic light on the way to work and happened to look in the read view mirror as the driver behind me mouthed the words "oh look, that's an electric car." Now, as a EV owner, you should seize the opportunity to show the superiority of electric drive when they present themselves - at least that's my story...
I was lined up at the light next to a Porsche Boxster, so when the light turned green, I punched it. The rear wheels chirped, a whiff of burning rubber and the Porsche was in the rear view mirror. Now, the Porsche driver didn't know he was racing anyone, but, for what it was worth, I think the point was made.
Wednesday, September 23, 2009
Burning rubber
I've been trying to get a 0-60 time on the car and I found that it's not as easy as it sounds.
First you need to find a place with a 60 mph speed limit, with light traffic, that is level for about a 1/4 mile and has a wide shoulder for you to start from. I'm also looking for a place that's along my commute or nearby so that I won't have to drive out of my way to do the test.
I found a place that is pretty close and bought a cheap stopwatch and made several attempts. Problem is, I'm better behind a wrench than behind the wheel. I shift too late, feather the accelerator too much not to mention being late with the stopwatch...
In my latest attempts I decided to just hammer it and shift at 5000 rpm and see how we do.
The first time I tried it the Zilla cut out - I started moving then, no power. After I released the acceleration and step on the juice returned. No point working the stop watch on this run.
I found that the Zilla Stall Detect was the culprit and disabled it.
The next morning I reset my stopwatch and drive out to the spot, pull to the shoulder, put it in second gear and wait for the traffic to clear. Once the coast is clear I hit the stopwatch and floor it. The motor revs and we start moving, but not too very fast - and then there is the smell of something burning. I back off the pedal and get to 60, but the stopwatch shows 14.4 seconds and the smell is now clearly burning rubber. I drive around the block and see about a ten foot strip of rubber leading off the shoulder and into the street.
So, the hammer plan obviously won't work.
I still don't have my 0-60 time, but I do have a nice strip of rubber to show for my trouble.
Saturday, September 19, 2009
Visit to the scales
Just made it back from the scales at the dump. I know, but I didn't have a truck scale nearby...
Anyway, after a little confusion I was able to get the guy in the booth to tell me the front total and rear weight.
The total weight (less the driver) comes to 2680 lbs. That's 564 lbs heavier than stock - not surprising with the amount of lead in the car.
The front came to 1460 and the rear to 1220 lbs. This works out to 54/46 weight distribution.
The Miata is known for it's "near perfect 50/50" weight distribution, but after a little research I found it was either 49/51 or 48/52 depending on the source. The designers of the Miata planned to even out the weight to 50/50 once the driver got in the cockpit.
I was out of the car when I did the weights, but given the extra total weight, I wouldn't expect my weight to influence the distribution by more than a point which would possibly make my car 55/45.
Sunday, September 13, 2009
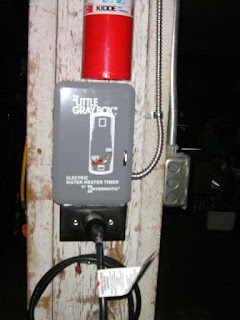
Charge Timer
Since I'm now on a time of day meter, I need to take advantage of the lower rates after midnight by using a timer.
If I was using 110 vac I could have used a $3.00 timer - actually, probably not, but a cheaper one, just the same...
I use 220 vac so I needed to use a high end timer designed to control an electric water heater - $41 at Home Depot.
The instructions were pretty clear and wiring it up was pretty simple.
Now I'm charging at $.05 a KWH.
Saturday, September 12, 2009
Shock Absorbing Stud Mounts
I have a bunch of speed bumps in the parking garage at work. Even though I try to ease over them, sometimes I hit them pretty hard. I started wondering what this was doing to my electronics - like my Zivan charger and Zilla controller. . .
I ordered some rubber mounts for my vacuum pump and thought I'd order 8 of them to use on my Zivan and Zilla. They are a little tricky to install - the rubber tries to twist rather as you tighten the nuts. If you put pressure on them, the rubber compresses and won't twist allowing the nuts to tighten up nicely.
Now both my Zivan and Zilla have a little give and I won't be worried about hitting those speed bumps a bit to hard.
Friday, September 11, 2009
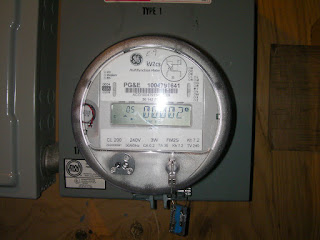
Discount Power
Power companies have excess power in the early morning hours. There generators are running, but since everyone is asleep, most of the power isn't used. Hence, this is the best time from the power company's perspective, to charge EVs - no need for additional power plants and extra revenue for the power companies. To encourage us to use this late night charging, many power companies have time of day metering where the late night power is significantly cheaper.
The local power company, PG & E has a special rate schedule for "experimental electric vehicles" called E-9. Applying for E-9 is tricky - you can find the rate schedule and a form to apply, but it doesn't tell you where to send the form and references a E-Net application that isn't mentioned on the web site at all. I sent them an email which gave me a contact that gave me the address.
After reviewing the rates, we decide to have a second meter installed for the car - that way we aren't paying $.28instead of $.11 a KWH for household appliances during peak summer months.
Okay, the form filled out I pop in in the mail and hear nothing. Friday morning a blue truck pulls up and a guy has a work order to swamp our residential meeter with a time of day unit programmed for E-9 rates. Not what we wanted, but after talking with him, we could either have him put the house on E-9 or not, he couldn't put a second meeter in. We decided we'd give it a try for a month and see how it worked.
Now I need to put in a timer on my charger circuit so that it only kicks in after midnight...
Sunday, August 30, 2009
Palo Alto EV Rally
The EV Rally on Saturday August 29th was a great success. Soon after setting up the space I had a constant stream of educated, interested EV enthusiasts checking out the car. Lots of good questions comments and good words. A number of people were interested in the kit, and there were a few who were interested in a completed car rather than attempting the conversion themselves - even had one guy offer to buy the car!
Later in the afternoon I had Jerry Pohorsky, the
EAA Silicon Valley President and organizer of the event, come by and give me an award for the best classic conversion. He was very complimentary of the car and our kit.
The event was scheduled to end at 4:00 and by then the crowd was dwindling. I had a couple of people interested in a ride, so off we went. I knew I had an error on my Zilla because the check engine light was lit and the charge light wasn't, but the car ran fine so I decided to ignore the error. Once behind the wheel I noticed the needle on the tach was pointing straight down - as if it was pegged - hmmm. The car ran fine so off we went, spinning the tires out of the parking lot and on to El Camino Real. 2 blocks down and 2 blocks back and I noticed the blinkers weren't working, but the tach needle was pulsing when the blinkers were on - hmmmm again.
For the next ride I had my passenger check the brake lights before getting in and took it much easier, even when we saw a 67 Mustang GT at a stop light... We got back into the lot without insident (or a ticket). I said goodbye to my passenger and started to break down my booth while trying to figure out what whent wrong with my 12v system. The first guess was a blown fuse and that the circuit fed back through the Tach causing it's problems.
After returning home I located the blown fuse and realized I probably popped it while towing the car. I have a trailer wiring harness connected to the Miata's lights so that when I tow it to a show the tail lights and brake lights work. I must have had it wired to the tow car with the power on in both cars to blow the fuse. Once I replaced the fuse the check engine light went out, the charge light is lit and he blinkers work (yay!) the tach, however still has its needle on the wrong side of the dial. Now, when I start the car up it pegs under zero rpm. I'll have to pull the dash apart to fix it...
Saturday, August 29, 2009
The Zilla is back!
After what seems like forever, the Zilla controller will be back in production.
http://www.cafeelectricpress.com/blog/?cat=2
Happy day!
http://www.cafeelectricpress.com/blog/?cat=2
Happy day!
Thursday, August 27, 2009
A trip to the BAR
Part of registering an EV conversion is having your car inspected by a Referee. They aren't checking your work or to validate if the car is "road worthy" they just look under the hood to see if they can spot an ICE hiding somewhere.
I called the number listed on the DMV web page and made an appointment. The closest location was at a college campus about 11 miles away with most of it up hill. I decided to not take any chances and tow the car.
I found a flat street within a mile of the college to disengage the car from the tow vehicle and drive it into the college. There was a lot of construction going on and the signs that were to guide me to the shop were less than obvious.
The referee was waiting for me in the college parking lot, and pointed me down to his shop. He was obviously a car guy and thought the Miata was really cool. He said it sounded like a big RC Car.
I gave a quick tour to him and a couple of his helpers/students who collected from the nearby shop bays. After a long discussion about estimated miles/gallon - "if it doesn't use gas than how can you say it gets an 80 mpg equivalent?" the crowd dispersed. I'll try to stay away from math next time...
One of the other student started telling me he is working on a hydrogen fuel cell project. I started to ask him if it was true that it took 4 times the energy - but decided not to press my luck.
At any rate, I signed a number of $0 estimates similar to a working garage (except for the $0 part) and they looked, but could not find an ICE hidden anywhere.
While my certificate was being printed, the next appoitnment drove up - a RX8 that evidently had evidently too loud of an exhaust note. The referee told the RX8 owner to look at my car, which seemed to puzzle him a bit.
With the certificate in hand, I made my exit, chirping the tires.
Tuesday, August 18, 2009
Blocked grill and "monster teeth"
Made a few changes in the grill area of the car. First of all, I bought a tow bar (from Harbor Freight) and mounting bracket (from Renenmetal) so that I can easily tow the car to events.
Miata's originally come with bracket on the sides of the grill area to tie the car down during transportation. They are known among the Miata aficionados as "baby teeth"and removing them is a mark of an enthusiast. My donor had them removed, but the tow bar mount came with "super sized" mounts. So rather than baby teeth, my car has monster teeth. I also wired up a trailer light wiring harness so the car's tail lights work while being towed.
Later, I got the bright idea to block the grill to improve the aerodynamics a bit. I bought a sheet of aluminum at the hardware store and after making a template, cut it to size. It took a while to get it to fit right. I used some leftover vacuum hose to cover the bottom lip.
I was going to paint it flat black, but I liked the aluminum look - it reminds me of an early 60's drag racer.
Seems to help as my range on the street appears to be about the same as on the highway.
Sunday, July 19, 2009
Re-Fuel Event
For various reasons, I wasn't able to make it to the Re-Fuel event as planned. I was really looking forward to taking the car out on the track to see what she could do, but it was not to be.
I am sure there were plenty of other electric and alternative energy cars in attendance, so that no one was too disappointed.
Hopefully I'll be able to make their next event.
Friday, July 17, 2009
Highway Cruising
As most of you know who have been following this blog, my commute is pretty short. I have been taking the streets and the route has some 45, 35 and 25 mph stretches with a number of hills, stop signs and traffic lights. Now I have taken the car on the freeway a few times for test purposes but just for an exit.
Lately, when I get in the car for the drive home at the end of the workday, the SOC meter will show 95% SOC. This can be attributed to the fully charged SOC showing over 100% as the Zivan will charge the string above what Optima said for 100%. In any case, last week I decided to take the drive home on the freeway. It was a bit tense as the SOC reads zero under load and I was pulling about 300 amps at 60 mph, but it was a fun ride. After sitting for an hour the SOC showed 45% - not bad.
Over the weekend I picked up a stock Miata "under cover" - this the plastic piece that goes under the engine between the nose and the subframe. My car didn't come with one and I wanted it to keep water off the motor when driving through puddles and for aerodynamics. I also picked up a sheet of aluminum for blocking off the air intake.
This week I've been commuting on the freeway just like the big boys. I'm now pulling around 250 amps at 60 mph (not sure if this has to do with a lighter touch on the pedal or the under cover) and getting about the same SOC displays as I was taking the streets.
My explanation for this is that the distance is about the same but there are no hills or stops to waste energy on.
Wednesday, July 15, 2009
EV Calculator
FYI - there is a handy EV calculator to help you in determining how your conversion project may turn out. I originally was told that it was pretty inaccurate, but now I see it was pretty close to reality.
I saved the EV Miata specs for your enjoyment.
Here is the link:
Now, it doesn't take RPM into account, which used to make me distrust the results, but just disregard the stuff about 90 mph is first gear. The Warp 9 has a red line of 8000 RPM.
I saved the EV Miata specs for your enjoyment.
Here is the link:
Now, it doesn't take RPM into account, which used to make me distrust the results, but just disregard the stuff about 90 mph is first gear. The Warp 9 has a red line of 8000 RPM.
Monday, July 13, 2009
Thoughts on Flywheels
Back in the 70's we had a subscription to Popular Science magazine and there was a lot of interest in alternative energy. I remember reading articles on cars powered by flywheels - you'd plug them in or use a gas motor to spin it up to some outrageous RPM and then drive around until the flywheel stopped spinning. I guess the idea was you'd go to a service station when your tach showed low RPM for a quick respin and then you'd be on your way again...
So what does this have to do with my car? Well, there are two camps on flywheels on electric cars - one camp says they are good and another says they are additional unnecessary weight. I belonged to the second camp but wanted a clutch so was stuck with the flywheel. You might have read some of the early posts where I tried (in vain) to get my flywheel lightened.
Since I've been driving the car regularly, I've changed my mind. In my experience, the flywheel stores your kinetic energy (just as Popular Science described) and helps keep the car stay in motion - reducing the amps needed to maintain a given speed.
The downside is that the flywheel slows your acceleration from a standing start (since it takes a lot of energy to spin up that big heavy disk) and it slows your braking (when in gear, your brakes are not only slowing down the car but the flywheel too).
The plus side is you get to retain your clutch which makes shifting gears easier and you can always use the clutch (or neutral) when braking hard.
Saturday, July 11, 2009
What's in the News?
I ran across this post and it was (excuse the cliche) like a breath of fresh air:
http://www.twilightearth.com/2009/07/a-word-on-pollution-and-the-electric-vehicle/
If you read the news on the internet you probably see a lot of negative opinions about electric cars. Most just point out common assumptions and repeat them as fact.
An example of this was recently in the Morgan County News. Now I have no idea where Morgan County is, but that's not important. What is important is that when these mis-assumptions get passed off as fact they get into the popular mindset damaging the acceptance of this needed technology.
Here's another fine example - just the headline is inflammatory: Electric Cars - Kinda Stupid
This post just takes a quote from Wired and adds a rant on non-recyclable batteries - as if EVs run on alkaline energizers that can't be recharged!
Now a lot of news posts stay away from benefit statements and just report the facts - Nissan announces a new model, new battery technology, etc. and that's good, but we as EV advocates need to be concerned about popular opinion too. Popular opinion can influence funding and the legislature which can make or break a technology change like we're advocating. Right now popular opinion is on our side, but it seems to me that this position is fragile and we need to do more to defend it.
So, what's my point? It made me think that we as a group need to be more vocal. We need to quickly comment on these postings pointing out the facts and, more importantly, calling out the writer for their ignorance, laziness or their transparent negative agenda. Why do we need to quickly comment? Most blogs and news sites show comments in chronological order. Having your comment on page 3 is not going to influence anyone.
So get out there and post.
What's in the News? Hopefully you.
Friday, July 3, 2009
EV Miata on TV
The local ABC affiliate did a short piece on the electric cars being shown at the Marin County Fair. I'm a little leery of dealing with the media - they don't seem to bother getting all the facts straight and are more concerned about telling a story (any story it seems) than getting the truth out, but figure it was work a shot.
Putting my leeriness aside, I took some time off from work to drive up to the fair for my chance at an interview, and it ended up being well worth it. I had a chance to talk with some of the other car owners/entrepreneurs who were showing their cars (all great people) and the reporter, Wayne Freedman, turned out to be a great guy as well. He asked good questions and seemed to understand the answers, to my surprise. I had about 5 minutes to tell my story and when it was done he asked if later they could take a ride in the car(!) Why my car instead of the Porsche speedster or Shelby Daytona replica, I don't know, but I was happy to oblige.
I hung around as he did a few more interviews then was politely told that time wouldn't allow a ride. Oh well.
The piece aired that night, and I missed it, (of course), but thanks to the internet it can be seen forever (or at least until the take it off their site). Only a few seconds of my interview made it into the final segment - kind of funny - the one line I have is about kitchen appliances...
Anyway, it's a pretty positive overall.
Here's a link to the piece - don't blink or you'll miss me...
http://abclocal.go.com/kgo/story?section=news/technology&id=6896777
Thursday, June 25, 2009
Daily driver
Been a while since I posted anything on the blog, so thought I'd give a quick update.
I've been using the car to commute daily and it's been working great.
In the morning the SOC gauge shows over 100% after charging overnight. I'm estimating it takes about 6 hours to charge.
It's a 9 mile route (4.5 miles each way) that I take which has a 40 mph stretch, a few hills and a number of stop signs and traffic lights, so not "ideal" conditions, but real-world.
It will take about 300 amps to get moving on the flat and 400 - 500 if I'm going up hill. This is not a "jack rabbit" start, but not slow either, I try not to annoy other drivers ; )
It takes around 200 amps to cruise at moderate speed (20 -30mph).
When I arrive in the parking lot the SOC gauge shows 60% (which is 80% SOC since my gauge shows only the top 50%).
I don't plug in at work.
The SOC gauge shows 95% when I'm ready to drive home, since the batteries have had a chance to rest.
When I arrive home it shows 20-30% SOC (depending on how aggressively I drove it home) but if I let it sit for an hour or so, it will show as high as 60%.
Plug it in and it's ready for tomorrow.
Monday, June 1, 2009
Maker Faire
The Maker Faire turned out to be a great event - I'm definitely planning to go next year.
It was a little beyond my range and, as you know from following the blog, my controller was "in the shop" so I had planned to tow it down to the event. I rented a truck and tow dolly from U-Haul and just as I had talked my neighbor into helping push the car on to the dolly, the UPS man showed up with my controller!
45 minutes later, I was driving onto the dolly. My dad helped me load and unload the car and even bought lunch along the way. We were assigned a space in a hall with 1 and a half Teslas (one was missing the body and interior), Cal Cars doing a Prius conversion and a converted dune buggy.
The SFEVA arranged for volunteers to help talk up electric cars and conversions in general which was a tremendous help. I talked to a LOT of people, some where new to the concept, some were thinking about converting a car of their own and even a few who follow this blog!
All in all it was a great event that I'll try to make an annual thing.
Wednesday, May 27, 2009
Batteries under glass
Sunday, May 17, 2009
A little rug to cover the bald spot
Had a an hour or so on Sunday and decided to do the carpet in the trunk. I took the stock carpet, marked where the battery rack was with chalk and cut it. Then I used the part I cut out to fill in where the spare tire use to be.
Next I need too get a piece of clear plastic to cover the batteries so I can use the trunk...
Monday, May 4, 2009
First trip behind a tow truck ; (
(EV
Things had been going real well lately, so something was bound to go wrong...
I was on my way to work this morning - I had just shifted into 3rd at 55mph when the battery light went out and the check engine light turned on. This meant the controller had turned itself off with an error. Since I had no power, I coasted to a stop by the curb in a nearly legal parking place.
I tried to start it a couple of times without any luck. I then pulled out my laptop to see the error code from the Zilla, and it indicated the Zilla and the Hairball weren't communicating. I checked the data cable and it was in place and properly seated.
It took about an hour for the tow truck to come.
I contacted the vendor I got the Zilla from (EV Source) and they contacted Cafe Electric who after a few questions sent me an RMA number for the Zilla and Hairball.
Good news is it's not something I did, but the car will be out of commission for a bit.
; (
Saturday, May 2, 2009
SFEVA meeting and a few odds and ends.
Saturday I drove the car out to the SFEVA meeting at Luscious Garage. It was a bit misty out, so I had my running lights on and the wipers on occasionally. Showed the car to a couple of people after the meeting and gave a ride to a fellow EVer on the way home.
After an hour the SOC meter showed just under 60% (80%) .
I have a few items left to finish on the car, and decided to tackle them while I had the time.
I hooked up the light in the Ammeter and trimmed the hood over the instrument cluster so that it could be re-installed. Looks pretty good - like a real car instead of a science fair project.
I also hooked up the disconnect switch - one of the things I hadn't got done after reassembling the car.
Friday, May 1, 2009
Full charge and a trip to work - and back
The message I got back on the charging issues from Ken at HotJuice Electric (makers of the BEQ1) indicated that the squealing battery could be ignored - it's either OK or it's toast, but continuing the charge with the voltage it's getting won't change things.
I also found out that my tires were at 40lbs. I thought they were at 50, must have misread my gauge or lost air since I re-inflated them... I noticed the tires say max pressure 50 lbs. - 55 won't hurt them then... and should make them roll a little better.
So Wednesday I decided to push ahead with a full charge. I wasn't able to start the charge until 6:00 pm as I felt I had to babysit it during the charge. I checked on it every 30 minutes (annoying my family no end) until about 11:00 when I figured I was committed anyway and just to let it finish. At 1:43 I heard the faint beep-beep of the Zivan in the garage indicating the charge was complete.
Thursday morning the batteries are all in the 13v range and I'm off to work. I planned a new route with less stops but a short 40 mph section. She does roll better and I did a better job staying off the accelerator. I got to work with an indicated SOC of 43% ( a little less than 75% in reality). I figured this would come up a bit as it sat.
By the way, the building at work set aside a primo parking place for hybrid drivers. You have to fill out a form an enter into a drawing where the winner gets to park there for a month. I filled out the form explaining that my car wasn't a hybrid but full electric and could they stick an outlet in the spot for me. I didn't expect much to happen, but figured it was worth asking. A week later I got a message that I won for the month of May! I must have been the only one to fill out the form... I replied thanking them and again explaining that my car was (still) not a hybrid, but would gladly use the parking spot.
At 12:30 the SOC meter showed 80% (90%). Not bad. Parking security put a nasty gram under my wiper explaining the spot was reserved for hybrids. I showed it to the attendant and explained that it "looks like a miata, but it's battery powered..."
At 5:30 the meter still showed 80% - I was hoping for 100% ; ).
I took the same route back home. I think I annoyed a couple of SUV drivers, but I stayed in the slow lane most of the way. I got home easily enough and after an hour the SOC meter showed 44%.
That's makes for about a 20 mile range with mediocre driving over a few hills and high-rolling-resistance low-profile tires.
Sunday, April 26, 2009
Sunday Driver
I wanted to get a test drive out to my work this weekend. I'm pretty sure I can make it there and back if it was flat all the way, but I have a couple of hills along the way...
Thursday and Friday i charged the pack. The two batteries that came back from the shop were fully charged, so I couldn't run the Zivan on the pack. I charged all the batteries individually until on Friday they were all in the 12.90v range. Then I ran the Zivan which quickly went into pulse charging mode, as it should.
After about an hour 11 of the BEQ1s were blinking - indicating those batteries had "filled up" and battery #12 started squealing, so I cut the power.
Sunday afternoon I checked the pack voltage and it was above 95% SOC.
I weighed my options and figured it was time for a drive.
The main objective is to get as far as I can, so I was trying to stay off the accelerator - not an easy task for me. At any rate, with one eye on the Ammeter and the other on the road, I was off.
The SOC meter isn't much help while you are pulling current. It dives down as the voltage sags and creeps up at the stop signs and while you coast down hills. Twice I pulled over to let the meter return to a stable reading. I got to within a couple of blocks from work and the SOC meter was showing 50% - meaning I had 75% left on the pack.
(BTW - my SOC meter reads the top 50% of charge, so when it reads 80% I actually have 90% and so on. It seemed like a good idea at the time, but it's actually kind of annoying. It's like setting your clock 5 minutes ahead - you find yourself constantly doing the math to convert to the actual SOC. Next time I'll just use a standard Voltmeter...)
So with 50% of my usable charge left, I turned back home. I arrived back in my garage with an indicated 20% SOC charge (you do the math).
When I put it on the Zivan, two batteries hit 14.7v in a little over an hour, while the rest are in the mid 13's. So I decided to abort the charge again.
I got a question into the BEQ1 vendor and the Zivan distributor to ask what I'm doing wrong.
Sunday, April 19, 2009
Return of the Electric Miata
Friday, April 17, 2009
Update
Quick update for those of you wondering "what ever happened to this car?"
Well, after having disassembled it so that the drawings for the kit could be done, I'm happy to say it is mostly reassembled. I'm hoping to have the car running once more this weekend.
I've also signed up to show the car at a couple local events.
It will be at the Maker Faire in San Mateo (CA) end of May and at the Marin County Fair in July.
If you are local, come on out - I'd love to hear what you think.
Saturday, March 14, 2009
Lithium in the future?
Since the car is a part while the engineering drawings are being made, I've been researching lithium batteries. I got a message lately reminding me that the price has come down quite a bit since I first wrote my FAQ on Lithium batteries too.
It does seem that Thunder Sky may be on their way to fixing their quality issues and the price is coming down. I found a couple of retailers (Elite Power for example) that offer 52 60 amp cells (equivalent to the 13 Optimas in my car) for $6240. Not bad.
The charger Elite Power offers is a HUGE thing, but I believe my Zivan can be reprogrammed for lithium. I haven't seen a good BMS system for sale though. Elite Power has a system designed to work with that big charger and Hot Juice Electric is dropping production of their BEQ boxes so that they can focus on bringing a controller to market. I'll keep looking.
Meanwhile, I'm having the kit racks tweaked a bit so that the 52 lithium cells can be installed without modification.
Monday, March 2, 2009
On to Phase 3...
Well, the project is now officially in Phase 3.
Back when I started this project, the activities were part of three phases.
At any rate, after I pulled out #2 battery to have it tested, I thought it was a good idea to start getting the battery racks drawn up so they could be duplicated. Pretty soon, all three racks were out of the car and it was nearly completely disassembled. I had intended on testing the range and 0-60 times first, but that will have to wait.
While I'm waiting on the drawings to be finalized I've been working on the installation manual. This is no easy task, but it's coming along.
Next is to find someone to test the kit in order to make sure the shop-made parts fit properly and the instructions are right. The plan is to offer the racks and brackets at cost and provide support for someone local to convert their car.
Back when I started this project, the activities were part of three phases.
- Phase 1 was to design and build the car.
- Phase 2 was to test and drive the car
- Phase 3 was to document the conversion so that a kit could be made
At any rate, after I pulled out #2 battery to have it tested, I thought it was a good idea to start getting the battery racks drawn up so they could be duplicated. Pretty soon, all three racks were out of the car and it was nearly completely disassembled. I had intended on testing the range and 0-60 times first, but that will have to wait.
While I'm waiting on the drawings to be finalized I've been working on the installation manual. This is no easy task, but it's coming along.
Next is to find someone to test the kit in order to make sure the shop-made parts fit properly and the instructions are right. The plan is to offer the racks and brackets at cost and provide support for someone local to convert their car.
Saturday, January 24, 2009
#2 is out, service disconnect is in
I was not looking forward to pulling out the number two battery. It has been not holding a charge and keeping the pack from getting fully charged, so it's got to go.
I had to remove the Zivan (you can see it upside down in the upper left of the pic.), a bunch of high voltage cables, the high voltage box and it's wiring and the bracket that hold all this in place.
Once all of that was out of the way, the battery was pretty easy to pull out and set aside.
Once the battery was out I started on my next project - installing the service disconnect. The idea is be able to disconnect the battery pack from the driver seat to make it easy to service the car or in case of an accident. Some people call these "emergency disconnect" switches, but I like the "service disconnect" name - why not put a positive spin on it?
There are three ways to do this
1. run high voltage wires under the dash to a breaker or switch.
2. put a low voltage switch on the dash to open a contactor
3. install a mechanical cable that activates a breaker under the hood.
Though I had originally planned on using option 1 and placing the breaker under the dash, I realized the high voltage cables really don't belong under there. I went with the 3rd option as it was the simplest, least expensive and safest (compared to #1).
I bought a choke cable at Kragen for around $5. I mounted the "pull" side on the tunnel near the bottom of the dash. This position provided the most room for my big feet...
I needed to mount the cable below the breaker. I ended up bolting an angle iron to one of the top rack's mounts. The cable itself was looped through a hole in the breaker's lever. The cable then looped together where a cable clamp to hold it in place.
It works good. It doesn't take much of a pull to pop the breaker, and just a little push to reconnect the pack. The breaker is spring loaded and does most of the work.
Sunday, January 18, 2009
Survey says!
I've gotten a number of questions about providing a conversion kit for the Miata so back in August of last year I posted a survey to determine what kind of kit people were interested in. The link was on all pages of the main www.evmiata.com site and asked you to vote for the components, battery and kit type that you'd like to see.
The choices were:
- 156v WarP/Zilla
- 144v WarP/Curtis
- 144v WarP/Belktronix
- 144v Selectria
- AGM
- Lithium
- Flooded lead acid
- Basic - Battery racks, brackets, motor mount and adapter
- Standard - all the above plus motor charger, controller and associated parts
- Complete - all the above plus bolts, cable ties and pre-terminated cables
The results were pretty impressive:
- 405 total surveys taken
- 180 votes (45%) went with the 156v WarP/Zilla route
- 29 votes (7%) went with the 144v WarP/Curtis route
- 57 votes (14%) went with the 144v WarP/Belktronix route
- 137 votes (34%) went with the 144v Solectria route
Of those voting for the 156v WarP/Zilla...
- 102 votes (57%) were for AGM
- 65 votes (36%) were for Lithium
- 13 votes (7%) were for Flooded
- 27 votes (26%) were for Basic kits
- 26 votes (25%) were for Standard kits
- 49 votes (48%) were for Complete kits
I'm closing down the survey today.
Thanks to all of you who participated in the survey!
Thursday, January 15, 2009
The Battery Story
I realized that the battery problems I've been having may not make a lot of sense unless you know the full story - so I thought I'd give you all a recap and some lessons learned so that you may avoid learning them like me.
I had 13 Optima D34M Blue tops delivered before I was ready for them to be installed. This wasn't a bad thing, in itself...
You are supposed to test the motor when it's first installed to confirm that the flywheel, clutch and the motor all all in working order. I put the car in neutral and since the batteries were there, I jumpered one of them to the motor leads. It worked fine, but I put a drain on one of the batteries and now they were no longer balanced.
Lesson #1 - use your starting battery for this test - not one of your pack batteries.
Next was a little mishap I had wiring up the batteries. The details are in a post called "the meltdown", but the end result was 5 batteries were shorted out with one of them taking the brunt of the damage. One was replaced (it was the original #4) but the others are still in the pack and now out of balance with the rest of the pack.
Lesson #2 - don't be a numskull and short out your pack - or, more correctly, don't leave loose ends of cables on your batteries. Each cable should have both ends connected before you move on to the next. Don't leave one end unterminated while you go onto the next cable.
With the pack out of balance, I began to charge each battery individually. This is the way to do it, but you should use an automatic battery charger with an AGM setting. I used a manual charger, and though it worked most of the time just fine... well you get the picture.
Lesson #3 - invest in an automatic battery charger with an AGM setting for individual charging.
I have heard people say that Optima doesn't have the best quality control and that one should expect a battery or two to fail in a pack, and I can say the 2 that have been troublesome so far (#5 and #2) were not overcharged by the manual charger. But, if I had not put the pack so far out of balance I don't believe I would still be dealing with battery issues today.
And that, I think, that is the big lesson.
Monday, January 12, 2009
Pressed into service
My wife called me at work yesterday to say her car broke. She wasn't too far from home when something went ding (her words) and her battery light came on, then her power steering was gone and then it started to overheat.
Any guesses?
Fan belt, maybe?
I got home at looked under the hood and the belt was there, and in one piece, but it was all wrapped up - looks like an idler pulley broke off.
It was 6:30 at night and I took the Miata down to Kragen for some ICE parts.
Kinda ironic, I guess...
I didn't have a chance to put them in that night, so the Miata got to run errands and drop our daughter off at school. She enjoyed riding in it, not because it's quiet or quick or emission free, but because she can sit in the front. Anyway these little trips confirmed my verdict on #2 - she's bad. So replacing her will be my project for the weekend.
Since I will have everything stripped down up front to pull the battery, I invited the draftsperson (do they still go by that?) over to start the drawings for the kit. Might as well take advantage of the situation...
I also might install the emergency disconnect cable. I bought a choke cable that I was going to connect to the main circuit breaker so that I could disconnect the pack from the driver seat. It's been sitting on the toolbench. Maybe I'll have a chance to connect it this weekend too.
Sunday, January 11, 2009
Sunday driver
Friday and Saturday I charged batteries - in between running errands and watching kids. But the pack is charged - though #2 is still acting a little flaky. I noticed that the pack looses voltage over time and am starting to suspect the Zivan may be putting a slight load on it. I've been leaving it unplugged from the pack to test my theory.
So around 2:00 Today the pack was fairly charged. My SOC gauge showed 95% which is closer to 98% in the real world, so I'm off. First thing I noticed in that the vacuum pump isn't working, but no matter, I'll just stand on the brakes like we used to do in the old days. I still have the tach set to display amps, and what a difference that makes in your driving style - you can't help but accelerate slowly and coast into intersections. They need to put something like it on gas cars - like an MPG gauge. Didn't make any friends with the other drivers, though. I took a mile and a half loop and came back to the garage to check things out. #2 is at 12.35v where the rest of the pack is in the high 12.4 to 12.5. I plugged the Zivan in and gave it some juice, but #2 came up to 15.6v pretty fast - the rest of the pack was in the 14v range when I had to abort the charge to save #2 from being overcharged.
I'm thinking #2 needs to go.
I let her rest for a bit then took her out for another drive. This was about a 3 mile loop (the trip odometer isn't working - gotta add that to my list). I took some streets with bike lanes and it sure confused the cyclists having a silent car running with them. I came back home with about a 70% SOC - not too bad. #2 was the lowest about a tenth of a volt below the rest of the pack, and again I had to abort the charge when #2 reached 15.6v.
#2 is in the most in accessible place in the pack - in the front of the nose rack on the driver side. I'll need to pull out the Zivan, all the high voltage cables to the box, pull the gauge, contactor and relay connections remove the high voltage box and bracket, then pull out #1 so that I can get to #2! It's gonna take me a full day just to get her out.
Friday, January 9, 2009
New #5
Sunday, January 4, 2009
Running out of things to do...
That sounds good doesn't it?
Today I went through my "Todo" list I made over the break...
#1 - Bleed clutch. I bled the clutch once before, but it still wasn't working. This isn't that bad in an EV, since there isn't much shifting involved, but I will definitely need a clutch to get my 0-60 time. I have a self bleeder kit (a plastic bag and a hose) so, once I took battery #6 out and cold see the clutch cylinder, it took maybe 10 minutes.
#2 - fix leaky (heater) hose. I'm using the heater core as a radiator/reservoir for the Zilla. Only problem is, I didn't plan for this and bent up the metal end when I pulled the engine. I spent 15 minutes making the leaky one rounder so that the hose clamp would seal.
#3 - Pull 12v lead to temp gauge. Before the break I troubleshooted the temperature gauge and found out my 12v supply wasn't working. I pulled a new wire from the fuse box to the instrument panel and wired it up.
#4 - Fix Tach. The tach hasn't worked and I've been suspicious of the sending unit. It is a magnet thing that looks like a plastic cup that is supposed to fit on the nose of the motor. Mine didn't exactly fit, so i added some washers to the mount so that it would. It's buried under Zivan, so fixing it is going to be tough... First thing they teach you in mechanic school (I'm told) is to start with the easy stuff, and work up to the hard. The easy thing is to see if some knucklehead mis-wired it at the hairball. Yup. White and Red were reversed. To test it out, I'll need to put the batteries back in and cable them up. Easier said then done, but they're in and I left the handle on #5 so I can easily pull her out later. I turned the key on, step on the throttle and the tach needle starts to wobble up the gauge - nice!
#5 Fix ammeter. Like the Tach, the ammeter has never worked, but I was on a roll. I started by setting my meter to millivolts and connecting it to the shunt (this is hidden in the high voltage box). I'm not sure what it's supposed to read, but the shunt is rated at 50 mv, so I'm guessing it should show 0-50 mv on the meter. I put the meter where I could see it from the driver seat and gave her some juice. The meter showed 7, 11, then 17 mv, which was enough for me. I then did the same test on the wires at the instrument panel with the same result. Hmmmm. Maybe the ammeter is bad? I decided there were 3 possibilities
#6 Fix light in temperature gauge. The light stopped working in the temp gauge, and since I has the panel out I removed it and found the light had slipped half way out of the gauge. That was easy. While I was at it, this gauge never fit in right, so I spent some time adjusting the mounting clamp so that it didn't hit anything in the panel. Fits nice now - no squeezing and cussing needed...
Now I was seriously running out of things to do while the batteries charge...
I decided to fix the driver side courtesy light. Some adjustments and contact cleaner and she works!
This is getting bad...
#7 Fix remote charge indicator. As you might remember, I put a charge indicator in the charge port (where the gas used to go) so you could easily monitor your charge without popping the hood. I had to extend the cable to get it to reach and it does light, but I noticed the LED blinked red when it should be blinking yellow... maybe a short? I'm hoping it's not the splice I did, if it is, then I got to pull the wiring out of the conduit under the car to fix it.
Starting with the easy stuff, I pull out the LED from the housing to check my soldering job. Well, the wires got all twisted up in the housing and shorted out. A little electrical tape should do the trick... I'm still charging the batteries individually, so I can't test it out yet, but I'm going to call it fixed just the same.
Back to the batteries...
I had charged up all the batteries up front before using the motor to test the ammeter and the tach. When I checked them with the meter, they were down around 12.6 where they had been above 12.8. One, #2, was at 12.45! That's a pretty substantial drop for not even driving the car.
I check the trunk rack and they were all around 12.8. Is it my bad #5 battery dragging down the batteries in the front racks? Or do I have more bad batteries? I have been suspicious of #2, maybe she's gone bad too? If I had the money, I would replace the whole lot of 'em.
We'll see what happens after #5 is replaced.
Today I went through my "Todo" list I made over the break...
#1 - Bleed clutch. I bled the clutch once before, but it still wasn't working. This isn't that bad in an EV, since there isn't much shifting involved, but I will definitely need a clutch to get my 0-60 time. I have a self bleeder kit (a plastic bag and a hose) so, once I took battery #6 out and cold see the clutch cylinder, it took maybe 10 minutes.
#2 - fix leaky (heater) hose. I'm using the heater core as a radiator/reservoir for the Zilla. Only problem is, I didn't plan for this and bent up the metal end when I pulled the engine. I spent 15 minutes making the leaky one rounder so that the hose clamp would seal.
#3 - Pull 12v lead to temp gauge. Before the break I troubleshooted the temperature gauge and found out my 12v supply wasn't working. I pulled a new wire from the fuse box to the instrument panel and wired it up.
#4 - Fix Tach. The tach hasn't worked and I've been suspicious of the sending unit. It is a magnet thing that looks like a plastic cup that is supposed to fit on the nose of the motor. Mine didn't exactly fit, so i added some washers to the mount so that it would. It's buried under Zivan, so fixing it is going to be tough... First thing they teach you in mechanic school (I'm told) is to start with the easy stuff, and work up to the hard. The easy thing is to see if some knucklehead mis-wired it at the hairball. Yup. White and Red were reversed. To test it out, I'll need to put the batteries back in and cable them up. Easier said then done, but they're in and I left the handle on #5 so I can easily pull her out later. I turned the key on, step on the throttle and the tach needle starts to wobble up the gauge - nice!
#5 Fix ammeter. Like the Tach, the ammeter has never worked, but I was on a roll. I started by setting my meter to millivolts and connecting it to the shunt (this is hidden in the high voltage box). I'm not sure what it's supposed to read, but the shunt is rated at 50 mv, so I'm guessing it should show 0-50 mv on the meter. I put the meter where I could see it from the driver seat and gave her some juice. The meter showed 7, 11, then 17 mv, which was enough for me. I then did the same test on the wires at the instrument panel with the same result. Hmmmm. Maybe the ammeter is bad? I decided there were 3 possibilities
- Wrong shunt. But they only come in 24, 50 and 100 mv, so I would think the gauge would still read something, even if the shunt was the wrong value...
- One or both Leads fell off the ammeter, I pulled out the panel and removed the ammeter - all were connected and even did a continuity test on the leads to double check my crimping was good.
- Defective gauge. I read the instructions from Westach, but there were no trouble shooting tips other than reversing the polarity if the needle goes the wrong way, but my needle never moves. I'll email them to see if there is another test...
#6 Fix light in temperature gauge. The light stopped working in the temp gauge, and since I has the panel out I removed it and found the light had slipped half way out of the gauge. That was easy. While I was at it, this gauge never fit in right, so I spent some time adjusting the mounting clamp so that it didn't hit anything in the panel. Fits nice now - no squeezing and cussing needed...
Now I was seriously running out of things to do while the batteries charge...
I decided to fix the driver side courtesy light. Some adjustments and contact cleaner and she works!
This is getting bad...
#7 Fix remote charge indicator. As you might remember, I put a charge indicator in the charge port (where the gas used to go) so you could easily monitor your charge without popping the hood. I had to extend the cable to get it to reach and it does light, but I noticed the LED blinked red when it should be blinking yellow... maybe a short? I'm hoping it's not the splice I did, if it is, then I got to pull the wiring out of the conduit under the car to fix it.
Starting with the easy stuff, I pull out the LED from the housing to check my soldering job. Well, the wires got all twisted up in the housing and shorted out. A little electrical tape should do the trick... I'm still charging the batteries individually, so I can't test it out yet, but I'm going to call it fixed just the same.
Back to the batteries...
I had charged up all the batteries up front before using the motor to test the ammeter and the tach. When I checked them with the meter, they were down around 12.6 where they had been above 12.8. One, #2, was at 12.45! That's a pretty substantial drop for not even driving the car.
I check the trunk rack and they were all around 12.8. Is it my bad #5 battery dragging down the batteries in the front racks? Or do I have more bad batteries? I have been suspicious of #2, maybe she's gone bad too? If I had the money, I would replace the whole lot of 'em.
We'll see what happens after #5 is replaced.
Saturday, January 3, 2009
Happy New Year!
I'm back.
and am anxious to finish this project. There isn't a lot left to do, just a few little things that need to be done...
First, the batteries. For the most part, they held their charge pretty well over the last 2 weeks. I still have the one bad battery, number 5, that needs to be replaced, but while I'm waiting, I'll charge up her sisters...
The only really new thing I have on my list is the fuse box. I originally had the Zilla and the vacuum pump wired to the same circuit. Later I added the Iota relay (so that it was only active when the key was on) to the same circuit and realized this was getting to be a bad thing. If the pump or relay blew, or shorted out for whatever reason, the Zilla would too. I bought a cheap fuse box on eBay before the break and today, mounted it on the firewall and wired it up.
While I was messing with the wiring I decided to tackle my wiring harness that snakes around the nose rack. It had gotten pretty messy from adding and moving wires after I had tie wrapped it all down and it's been bothering me. In case it's not clear enough from that comment, I have a *thing* about wires - OCD. It started when I worked at the phone company. Anyway, I had to disconnect a lot of the wiring and one cable, but after an hour and a half, it was nice and clean - no wires wrapped around each other and all covered in the wiring loom.
Subscribe to:
Posts (Atom)