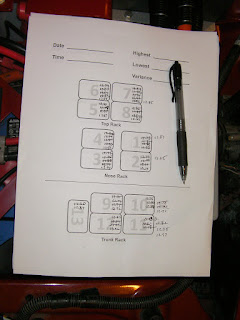
Sunday, November 30, 2008

Owe you all an update...

I realize it's been a while since I have updated the blog. Over the last couple of weekends I got the batteries almost balanced, I reworked the instrument cluster, got the hood reinstalled and a bunch of minor little things.

Balancing the batteries has been a huge pain. I did get to learn a lot of things NOT to do.
  1. Don't expect that two batteries with similar idle voltage readings have the same state of charge. (I lost a good two weeks learning this one).
  2. Don't expect a standard battery charger to hold up to charging 13 batteries multiple times over 3 weeks.
  3. Don't expect your timer to not fail when you aren't watching
1. I thought that if I got all the batteries to within a tenth of a volt that they would all be relatively the same state of charge and I could then use the Zivan to charge them up to 100%.
Wrong.
Some were always getting over charged while others got undercharged - the Equalizers would start blinking and batteries would begin to hiss.
The right way to do this is to bring them all up to 100% first. And measure the voltage THE NEXT DAY - not in an hour or even two hours after charging. I have a couple of batteries that will slowly drop over night back to where they started. Multiple long charges was the only way to get them up to capacity and stay there.


2. I have a good charger
for my ICE car. It has a 6 amp and 2 amp setting with an ammeter on the front. After using it constantly, though, I noticed some batteries weren't charging. Comes out the crimp connection on the positive clamp had worked it's way loose. I would connect it up to the battery, read the voltage, plug in the charger and see the voltage rise, but when I returned the voltage was back where I started. At first I thought the battery was being difficult... Then I found the wiring problem.

3. My charger doesn't shut off by itself. To avoid overcharging, I used an appliance timer set to an hour and a half. This was working pretty well until I got too confident and didn't check on it. Naturally, by the time I did check on it, the timer was stuck (it's little motor was overheating) and my battery was over
charged and hissing. The lesson here is to use a timer, but always check - don't assume.

In the end, I got them all above 12.84 volts (100% SOC) and ran the Zivan for a half hour or so. The Zivan did it's pulse charging thing, and everybody appears to have survived.

While all this battery baby-sitting was going on, I did disassemble the instrument cluster to fix the lamp problem and some of the wiring. I was trying to pull 12v and GND from the back of the cluster for the temperature gauge, but it still doesn't work right. My new plan is to grab GND from the dash a
nd 12v from the alternator light (the Zilla uses this as a contactor closed indication, so it's on when ever the car is operational). That should do it. I'll check the ammeter and tach after this.

The hood ended up being trickier than I thought it would be. First, the box I put the high voltage components in was a little too tall. It fit under the hood with the top off, so I only needed to take less than a 1/4 inch off of it. I had plenty of room, so I went for 1/2 inch just to make sure there were nothing banging when I hit a bump.
I cut the top edge of the front down with my Dremel. The plastic cut easily, but was so hit it
would melt back together after the blade passed by. I only broke three blades dealing with this. I decided to cut the sides at an angle so that the back side of the box was not cut - mainly this was to save me time, but it also looked better angled - it looks more like it was designed to go under the hood.
I hadn't thought about the hood prop rod. The stock mount was below the top of the high voltage box, and if I just bent the rod to go over the box, it would hit part of the headlight bracket and never reach the hood. I ended up mounting it to the back of the headlight bracket and after straightening it out, putting a bend in it to lie over the top of the high voltage box when down. Of course, this made the clip that the for end of the rod too low. I ended up using an unused wiring mount to mold down the end of the rod.
The hood went back in place pretty easily - it's aluminum, so you don't need to get a neighbor to help. The only thing that didn't align properly were the headlight covers. Comes out the back side of the covers doesn't have any support, so every time you lean on them, they drop a bit. I carefully finessed these back up into position and it looks like stock.

Now the only way you know it's electric is from the lack of a exhaust pipe and the buzz it makes as it drives by...

Sunday, November 16, 2008

Gauges again

I have four main things to finish on the car:
  1. Get the full charge on the batteries. This first requires that I get them balanced.
  2. Install the instruments
  3. Fix the clutch (new on the list since yesterday)
  4. Attach the hood and prop rod (this one should be easy)
While I was charging batteries I set out to tackle the instruments.
Last week I took a template of the plastic piece I needed to cover the original gauges that I was keeping (tach, speedo and idiot lights) the temp, fuel and oil pressure gauges were replaced an ammeter, State of Charge meter and a temperature gauge for the Zilla. And yes, I could have reused the old temperature gauge, but I think it would have looked funny.

At any rate, The plastic cover fit pretty well it just needed a few adjustments with the Dremel. I hooked up light kit and fed the wires through some holes I cut in the sides and crimped on some connectors. The lights had to be connected to the one in the instrument cluster so that the dimmer would work right. I traced out the wires and soldered a pair of flywires to the circuit board for these. These are the two black wires running across the back of the cluster in the picture. So far so good.

I had fed the wires through the firewall and up to the where the cluster goes earlier, Now I just needed to crimp connectors on them. Here's a tip: make the connectors all the same just in case you mess up the wiring. I made all the instrument connectors female and all the wire side male. And, I thought the blue went to the SOC meter, when it went to the Ammeter... Works out nice when you plan to make mistakes. ; )

Once I got them in, the SOC meter started working, but nothing on the ammeter. I tried reversing the polarity but still nothing. The temp gauge didn't move, but the Zilla was still cool to the touch after a couple of drives, so maybe it was okay.
Next I tried the lights and, the temp gauge went up when the lights went on. Hmmmm, must have the ground or the positive leads wrong. When I turned the key on with lights lit, the temp gauge bottoms out like the polarity is wrong.

So, of the 5 gauges...
  • The tach doesn't work, but it lights up
  • the SOC works, but the light is too close to the face and lights a corner of it up
  • the speedo works and lights up fine
  • the ammeter doesn't work, but lights up
  • the temp gauge is mis-wired, but it lights
So, the cluster needs to come out for a little reworking...

I had a nice visit with a fellow Miata converter. He is using an ADC with a Curtis and 15 8 volt batteries. Funny thing is, he lives about a mile from me. What I thought was really interesting is that he took his gas tank out from the top - he cut away the sheet metal with a sawzall and lifted it out. Pretty cool. I'm going to try to go look at his car later.

Saturday, November 15, 2008

Drive time!


I finally got the car on the road today! Maybe I should have waited until all the batteries were equalized and fully charged, but I didn't.
I've been stealing time this week charging the batteries one at a time and trying to track down an error the Zilla was giving me. I learned 2 things:
#2 Don't connect the DC/DC converter to the switched side of the contactor or the Zilla won't be able to pre-charge properly.
#1 (most importantly) don't bug Otmar with these kinds of questions unless you bought the Zilla directly from him. I thought it was something stupid I did (which it was) but it took too long to sort out and Otmar got a little peeved that I was wasting his time when technically I should have gone to Ryan at EV Source for help.

I was pretty excited to get it back on the road again, so took it for a quick run, then I had my daughter get in the car with me, then my wife wanted to drive it around the block...

I'll try to edit the videos and get them up to YouTube this week.

A couple things I noticed while driving:
- the clutch isn't working. Not a big problem as there isn't a lot of shifting at speed in an EV unless you are on the highway, which is not in my immediate plans.
- it's pretty fast. My runs were uphill at a sight grade and I could easily burn rubber
- I kept thinking i had a flat. The tires are pretty sticky and at low speed all you hear is tire sounds. That with the manual steering (with an extra 100+ pounds in the nose) makes it feel like the tires are flat. Once you step on it, though,the feeling goes away.
- it makes a nice wooshing/whirring noise like a jet but not nearly as loud. Not sure how much of this are my tires...

I don't have the gauges in it, so I won't be taking it to the Green Fair we have today. I don't want to have to tow it home.

Sunday, November 9, 2008

Little this, little that...


Didn't have much time to work in the car this weekend, but I did sneak off to the garage a few times. The constant battery charging was the major activity this time. The pack is out of balance and I find myself charging each battery with a 6 amp 12 volt charger that needs constant monitoring. I'm trying to get them all within a tenth of a volt so that the Zivan and BEQ1s can do their job, but so far this has proven - what's the word - elusive.
At the moment, I have two in the 12.6 range five in the 12.7 range, 4 in the 12.8 range and one lone cowboy hanging in around 12.92. My plan is to bring the 12.6s into the 12.7 or 12.8 range and hopefully, that 12.92 will drop into the 12.8 range on it's own. If not, I may jumper it to the SLI battery and do the headlight trick again...
I'm a little concerned that one of the 12.6s doesn't seem to hold a charge well, but won't worry about it too much right now.
Both the hissing batteries seem to charge up and hold a charge well enough, so we may be okay there.
I did take a trip to a plastic store to have the cover for the gauges made. I made a template out of construction paper. It should be ready on Tuesday.
I also got some 9' of wire for the ammeter and SOC gauges. The wire that comes with the gauges is 16 gauge stranded, and I let the guy at the hardware store talk me into 18 gauge solid. His argument was that it was to short a run for a resistance to be built up. Maybe so, but getting the solid wire into the wiring loom was a major hassle. Next time I'll order 16 gauge stranded on the 'net.
I've been noticing the Zilla hairball is showing an error and hooked up my laptop to see what it was. It's error 1131 - Shorted/Loaded Controller during precharge. There's no info in the manual, or on line on how to troubleshoot this, but I have faith that Otmar will help me out.

Thursday, November 6, 2008

Out of balance (still)

My new Fluke came in the mail yesterday. Now I can see what's really going on with my batteries and it aint pretty.
Last time I ran the charger I noticed two batteries where hissing. This is bad news for AGM batteries as it means the valve is open and they are off gassing. Since they are sealed, there is no way to refill them. I did some checking on line and some people seem to think that it doesn't necessarily mean the battery is bad.
We'll have to see.
Here is the last set of reading I did:
#1 12.38
#2 12.59
#3 12.36
#4 12.41
#5 13.13 (hissing)
#6 12.63
#7 12.50 (hissing)
#8 12.67
#9 12.60
#10 12.45
#11 12.66
#12 12.44
#13 12.45

I've been emailing Ken at HotJuiceElectric (the makers of the BEQ1) who has been real helpful.
He's telling me the BEQ1s won't balance the pack, but keep it balanced. His suggestion is to charge them all up one at a time until they show 13.2 volts each. I was hoping to avoid this since it may take me DAYS to get them to this point, but it looks like I won't have much choice in the matter.
Ugh.

Sunday, November 2, 2008

Out of balance

I'm having trouble getting the batteries in balance so that they can be charged.
When I fire up the charger, I get some BEQ1s lighting up yellow and in 90 seconds one goes red indicating overheating.
Some batteries are around 13 volts and some are just under 12. They should be 13.2 volts when fully charged, and they are shipped charged. I blame this on my shorting out of the nose rack that melted one of the batteries. I think that drained the other 3 in the pack and the replacement battery has a higher charge.
My plan is to charge the low ones one at a time with a 12 volt charger and drain the high one a bit by connecting it to the SLI battery and turn on the headlights.
My cheap meter isn't exact enough for me to tell what's really going on, so I ordered a Fluke on eBay.
More on this later...

While I was charging and draining the batteries I did some more wiring.
I traced out the wire to the Tach and hooked it up to the Zilla's Hairball and ran a new wire from the dash down to the hairball for the Check Engine light. The stock wiring for Check Engine goes to the ECU, which was located under the front floor board on the passenger side. Doesn't do me any good there, so a new wire was in order.

I did a little more dressing of the wires after that.

With these last two wires hooked up I could finally chop out the rest of the wiring harness. This actually was kinda fun. After chopping, I wrapped up the ends with tape so that they won't short anything out. It looks a lot cleaner and there won't be anything to rattle around when I hit a bump.

Saturday, November 1, 2008

Remote charge indicator


I didn't have a lot of time to mess with the car this weekend, but got a bit done on Saturday. I've been having troubles with balancing the battery pack (one battery in the top rack is overcharged), and it occurred to me that this may be an answer to another problem. On and off, I've been looking for suitable wiring to extend the temperature sensor and remote LED for the Zivan so they reach to the back of the car. Since a battery up front is running hot, I could put the sensor on it and only have to extend the LED indicator. The LED is 3 color, so it needs 3 wires. I guesstimated I needed to add 6 feet so I cut 7 feet of 4 pair , doubled up the leads for less resistance and soldered them to the original cable. I put in a pull string when I pushed the 220 volt cable through the PVC pipe that acts as the wiring conduit, so pulling in this cable was pretty easy... I should have cut 8 feet, though because I only had about 6 inches to work with when soldering the wiring to the LED.
It all worked out though. It looks pretty slick as the whole cap lights up with the LED, though you can't really see this in the picture because of the flash. One thing I found out - the indicator is disabled on the charger when you plug in the remote. Would be nice if they both worked.