Sunday, August 24, 2008

The meltdown


Is it better to be smart or careful?
In my case, I was neither, or maybe I'm guilty of thinking I was smart, and careful.

I'm not sure exactly how it happened, but I do know that I had my cables laid out on the batteries on the nose rack. I had made the cable from most positive (the + terminal at the beginning of the string) to the the Zilla B+ terminal and the cable that connects the nose rack to the motor rack. I was measuring the cable that interconnected two terminals of the motor when it happened.

There was a loud snap.
Sparks flew.
Smoke filled the air.
And the smell of something burning.

I quickly pulled a sparking cable off the battery rack it was touching, and it stopped.
After the smoke cleared the cursing began.

Evidently, the Zilla cable that was just set in place slid off the terminal and touched the rack. A 5/8" open end wrench qas touching the rack and a cable. Enough of the cables made contact to complete a dead short across the batteries frying one of them. The terminal was melted away, as was a piece of two cable clamps and my 5/8" wrench. There was what appeared to be gray paint splattered around, but it wasn't paint, it was the lead post that vaporized.

I would like you all to think I'm brilliant and don't make mistakes, but in reality, neither is true. I make mistakes just like everyone else. So the message for this post is: don't be smart or careful, be safe. Don't think it won't happen to you or that you can just be careful - avoid the situation entirely by not taking chances - be safe.

Saturday, August 23, 2008

It takes a village...


Sorry for the cornball title, but I wanted to mention something about the EV community. There are a lot of knowledge people out there willing to help answer your questions, loan you a hand or, in my case, a tool. I've gotten to the point where I need to start making up the high power cables - these are the ones that connect the batteries together in one long series string and connect up the main contactor, fuse, breaker and controller. To make these cables, you buy a roll of fat cable (I used 2/0 welding cable), some terminals (lugs and/or cable clamps) and then crimp them on the cables. A special tool called a cable crimper is needed to do this. You can get an inexpensive hammer crimper for $35 all the way up to a ratcheting hex crimper for around $300. In my research found that most people recommend the hex crimper (the ratcheting part is a nice addition, but not necessary) - but these run well over $200 and how often are you going to use it? Since I belong to my local EAA (Electric Auto Association), I decided to see if I can borrow one from a fellow member. I was overwelmed at the response. People offered to deliver it to my home, to meet me after work, to come over and help me crimp the cables over the weekend - amazing!
So I was able to borrow this expensive and amazing tool from a fellow EVer, no questions asked.

The crimping was kinda fun. The tool takes some muscle, but the results were clean and professional looking - if I do say so myself.

Friday, August 22, 2008

No more Zillas?


Big news today - Otmar is calling it quits. He evidently is having health problems related to running his business and looking to sell out.
Zillas are generally regarded as the best DC EV Controllers available. I would hope that someone reputable will take it over and keep these outstanding products on the market.

Read all about it on the Cafe Electric Blog:
http://www.cafeelectricpress.com/blog/?p=45

Tuesday, August 19, 2008

Keeping busy


My family was out of town tonight. Do you think I read a book, or watched some of the Olympics?
Nah, I worked on the car...
First I mounted the potbox - this is the electronic throttle that tells the controller how much juice to give the motor. I mounted it on the firewall behind the windshield washer reservoir. I thought about a number of ways to connect the accelerator cable to the lever and ended up using an electrical lug crimped to the cable. I then wrapped the extra cable around the mounting screw and attached it to the lug with a mini cable strap - this gives me a little reassurance that if the crimp comes loose that the cable loop will keep it working. Furthermore, since I didn't remove the end cap from the cable, if the crimp comes loose AND the mini strap breaks, the end cap won't get pulled through the lug, keeping the potbox working, though not as well.
Redundancy is good - double redundancy is even more gooder.
Sorry - I took the picture before I did the double redundancy stuff.

Next I drilled out the temperature sending unit so that it would fit under one of the Zilla's water fittings. The sending unit comes with a 1/4 lug, but I needed it to be 3/8". A little drilling, a little filing a and a little Dremeling and voila.

Lastly, I flipped the cover over on the Zilla so that the graphic was right side up. I know, but it was bothering me.

That's enough for one night.

Saturday, August 16, 2008

brackets and mounts


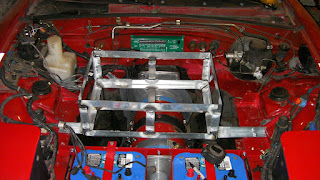
Saturday I got to do a little bending and welding to finish off the mounts for the Iota and the Zilla, plus I got the battery straps mounted on the motor/cowl rack.
I wanted to attach the Zilla using a separate bracket so that other brackets could be used if another controllers was called for. The braket mounts to the rack, one of the rack brackets and a miata hole near the shock tower. I used flat head machine screws to that the bolt heads wouldn't interfere with the Zilla.
The Iota was originally going to mount with a bracket, but after some experimenting I found it could fit against the passenger side of the rack really nice. I welded up 4 tabs for it on the rack and drilled them out for flat head machine bolts so that the bold heads won't gouge the batteries.
Lookin' good.

Wednesday, August 13, 2008

Survey results - first pass

This morning I decided to see how the Conversion Kit survey was going.
I had 49 responses so far with the majority (45%) going with my components (156v, WarP 9, Zilla...) and 59% of those went with the Optima battery option. I'll take that as a vote of confidence - or maybe I was just lucky. This group was pretty split between the Basic kit at 38% and the Complete kit at 54%.

The runner up was pretty interesting... actually something I was considering for my next conversion...
39% of the votes went for an AC system from Selectria and the majority of the battery votes (47%) of this group went with Lithium. A good number (37%) went with Optimas.
Interesting...

There is still time to get your vote counted in the survey, and it only takes a few seconds (because there are only 3 questions). Just click here.

Monday, August 11, 2008

Iota is here


Got a big box today with a little 45 amp Iota in it. It's smaller than I thought, ought to be easy to find a spot under the hood for it. That's a dime on top of it so that you have an idea of the size.
By the way, I was going for their 30 amp model, but found a place that was selling the 45 amp model for about $135 - $15 more than the 30 amp model. This was about half what I thought I'd be paying, so why not go for the more powerful unit?

Saturday, August 9, 2008

Brackets on the motor rack


Got a chance to do some welding today and went after the brackets for the motor (cowl) rack. I decided to offset it to the passenger side so that it could be as close to the cowl as possible (making room for the brake booster). This also will give me a good location to mount the Zilla - just ahead of the booster. The front brackets weren't very tricky, but the rear ones had to be angled to align with some existing holes in the frame rail. The one on the passenger side had to sneak under 2 brake lines also, so it is angled and shaved on the top.

At any rate, the holes all line up and the welds look good. Next is to weld some tabs on the driver side to attach a bracket for the Zilla and on the passenger side to attach the Iota.

Oh, you might notice a little green box behind the rack. It is the Zilla's "hairball" (its wiring box). I screwed it to the firewall a week ago. After I get everything mounted I'll get started on the wiring.

Friday, August 8, 2008

Charger quandry

I was about to order the Manzanita Micro PFC-20 I planned to use when I found out some bad news. First, the price has gone up around $300, second, there is now an 8 week wait for delivery and lastly, it appears you can't get the battery regulators that are made to work with it.
The battery regulators are needed for the AGM batteries I'm using to keep them from being damaged from overcharging since they can't "off-gas" like old school flooded cells.

I spent some time researching the battery regulator options and found PowerCheq and BEQ1.

The PowerCheqs sight says they may not work with long battery strings. I contacted Ryan at EVSource who sells them to see if they would work with my 13 bat string. Ryan replied that he didn't recommend them, and haven't got a reply when I asked for the reasons why.

BEQ1s looked good and were designed to work with the Optima D34M batteries I'm using, plus they are $20 less than the PowerCheqs. I contacted the manufacturer of the BEQ1s to see if they would work with the PFC-20 and the answer was no - they only work with the Zivan NG3. I had looked at the Zivan, but they are not dual voltage like the PFC-20, so I would need two chargers - one for 220 at home and another for 110 opportunity charging while on the road.
The Zivan is smaller and cheaper than the PFC-20, so it's worth looking into, and maybe I can come up with a cheap way to handle 110 charging...


I checked around and found a step up transformer that says it can step up a 15 amp 110 circuit to 220, but doesn't give an amp rating for the 220, but it's less than $100. I sent the Zivan folks a message to see if they thought this idea would work. Their reply was to say the NG3 charger needed more amps than the charger would offer and that they would get back to me with a proposed solution.

Maybe I need to get a cheap Rusco for the 110 charging and mount the Zivan in the garage?


So, I guess I'll wait to find out what the folks at Zivan come up with...

Saturday, August 2, 2008

SFEVA meeting thoughts

The August San Francisco EV club meeting was focused on conversions, and Dale Miller asked me to talk about this project. I was pretty honored to be invited - it was only 2 years ago that I knew nothing and now I'm being asked to play expert. Luckily Lawrence Rhodes (who I knew from his postings on a number of EV discussion lists) was there to keep me honest. There were a surprising number of really good questions from the group - obviously a lot of people there were seriously considering a conversion and were deep into the research phase.
During the introductions someone mentioned they were doing 2 AC 914 conversion . I should have made a mental note of this, but instead rambled through why I didn't choose a 914 or an AC conversion and later realized that since I was in the role of an expert, I might have offended him. If so, I apologize.
But what I did want to mention here in the blog was some details around the Miata's specs. One of the questions that came up was around the curb weight of the first generation Miata. I, of course, being unprepared gave an answer I thought was right, but was, in a word, wrong. I have since looked it up and found the Gross Vehicle Weight is 2700 lbs. (on the door jam sticker) and the curb weight is listed on edmunds.com at 2116 lbs. So what does this mean? The curb weight is the weight of the car with fluids and a full tank of gas. I believe in 1999 the government also wanted to include the driver weight of 150 lbs, but this is a '92, so no driver is included in that 2116 lb. figure. The Gross Vehicle Weight (GVW) adds the weight of a driver, passenger and cargo and is intended to represent the maximum weight the car is designed to carry. I have heard some EV conversion shops talk about not exceeding the GVW in your finished EV, or you might have structural problems. Of course, those can be mitigated by strengthening the car's frame, but it's still a good rule of thumb.
The other question that was a stumper was on Miata's aerodynamics. I like to say the Miata has good aerodynamics, but when asked for the figure, I drew a blank. I had to look this up again, and found a listing on Wikicars.org that said " The body was reasonably aerodynamic, with a Cd figure of 0.38." Now .38 isn't particularly good, but it's better than a Triumph Spitfire, but not quite as good as a '99 Mustang (http://en.wikipedia.org/wiki/Automobile_drag_coefficients). I suspect that a modification or two (like a belly pan) might improve this substantially. I guess I'll try to say the Miata has OK aerodynamics...
So thanks agian to Dale for inviting me and the attendees for putting up with my rambling talk. Hopefully someone got something out of it, and don't forget to question authority.